
SC Marine Game Fish Tagging Program
Tagging
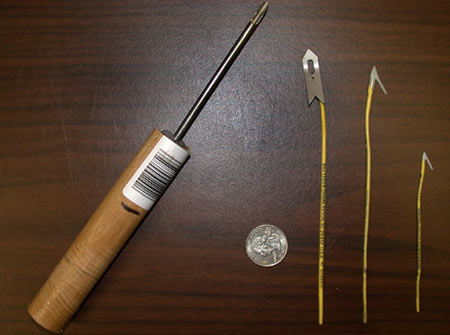
(From left to right) Tag Applicator, "A" tag, "K" tag, "E" tag.
There are three different types of tags available for tagging saltwater fish.
Please be sure to specify which type of tag you need.
- Large (A Series) Tags… For
Billfish, and Sharks over 48 Inches.
- Medium (K Series) Tags…
For Amberjack, Cobia, Dolphin,
King Mackerel, Red Drum> 27Inches, Tarpon, Tuna and Wahoo.
- Small (E Series) Tags… For Bluefish, Black Drum, Red Drum 18-27 Inches, Groupers, Sheepshead, Snappers, and Spadefish.
Applicators for the appropriate tags are also supplied free of charge.
How to Apply the "Dart Style" tag ("E" and "K" series)
Carefully bring small fish in the boat for tagging. Larger fish should be
tagged alongside the boat. Minimize handling of the fish, being careful not to
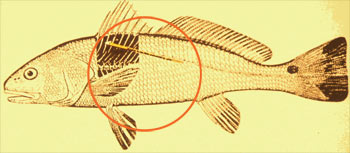
place fingers in the eyes or gills. The tag should be inserted on the back of
the fish near the first dorsal or top fin. The dart barb should "lock"
into place between the internal fin rays under the dorsal fin. On larger fish,
the tag should be inserted near the second dorsal fin in order to take advantage
of the internal fin rays being closer together.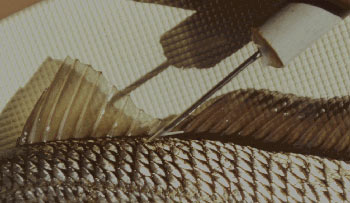
- Check the number on the tag to make sure it matches the number on the card.
- Position the tag applicator so that the tag barb is toward the dorsal fin spines of the fish. On a heavily scaled fish, use the tip of the steel applicator to go under the scale. Do not remove a scale.
- Begin by inserting the applicator tip at a shallow angle under the scale until you feel it pierce the skin, then raise the applicator to an angle of 45 degrees.
- Continue inserting until the tag barb is embedded in the fish's muscle. A slight "click should be felt as the tag barb slides over the fin ray and locks behind it. Gently pull on the tag to set the barb against the bone. Positive resistance should be felt.
- Measure the fish's length and record on the card. Measurements should be taken from the tip of the lower jaw to the tip of the tail. If a fork length (lower jaw to midpoint of tail) is taken please indicate this after the measurement.
- If necessary, gently aerate the fish by moving it forward and backwards through the water until it is able to swim off on its own.
As soon as the fish is released, record all information on the tag report card. Please be as precise as possible when measuring the fish and reporting the release location. Place the card in the mail as soon as possible.
How to apply the "Harpoon" tag ("A" series)
The "A" tag is recommended for billfish (blue marlin, sailfish, white marlin and swordfish) and large sharks (over 48 inches). Like the "E" and "K" tags, the "A" tag consists of yellow tubing (streamer) bearing the tag number and the Marine Resources Division address. Unlike the other tag types, attached to the streamer is a pointed stainless steel anchor. A special slotted applicator, fastened to a long pole holds the dart tip in place during the tagging procedure. The program provides only the stainless steel applicator tip free of charge.
- Check the number on the tag to make sure it matches the number on the card.
- Use a rubber band to firmly hold the tag on the tagging stick.
- Holding the leader, guide the fish alongside the boat.
- The person tagging the fish should be positioned behind the fish to get a good angle for tagging.
- Make sure the tag head is turned towards the fish. The tag should be "harpooned" into the dorsal muscle (back) area of the fish nearly half a body length back. The tag should be positioned at a forty-five degree angle to allow the tag to lie along the fish's side as it swims.
- A good estimate or measurement of the fish's length should be made before it is released.
Record all information on the tag report card before tagging another fish.
Please place card in the mail as soon as possible.
You will be notified if your fish is recaptured
The tagging kits cost the tagging program about $15 each but are free to anglers. Because the program operates on such a limited budget, anglers are asked to use the tags wisely and conservatively. Please follow the program guidelines.